From the Assignment tab, click Demand
Estimate Review. The Claim Info screen displays something like
this 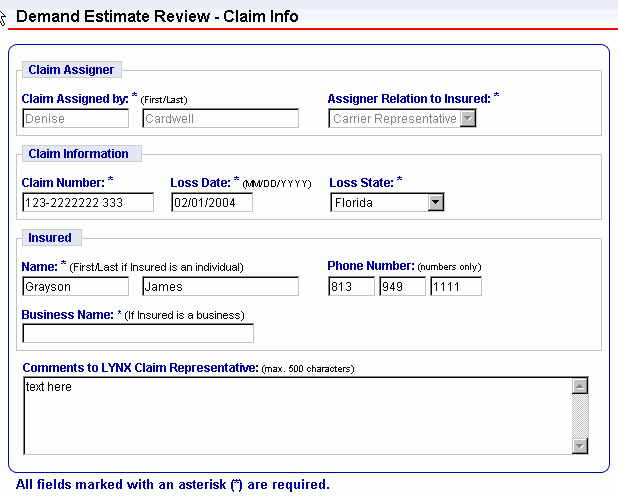 .
.
Note that all required fields are indicated by an astericks.
Claim Assigned by defaults to your name and the Assigner
Relation to Insured field defaults to Carrier Representative.
Note: For LYNX Employees, select the carrier representative's name
from the Claim
Assigned by drop-down list.
Enter the Claim Number. The system checks to ensure the number is formatted correctly. If the formatting is incorrect, you see a message indicating the proper formatting.
Enter the Loss Date. Type in mm/dd/yy. This cannot be a future date.
Select from the drop-down list the Loss State. The available states list is determined by the Carrier Configuration for your company.
Enter information for the Insured:
For an individual, type the First name and then the Last name. Include a middle initial or name in the First name field.
For a business, enter the Business Name.Type in the Phone Number for the Insured, including the area code, exchange, and unit number.
Enter your Comments to LYNX Claim Representative. Here you can provide information necessary to the handling of the claim. The field allows for a maximum of 500 characters.
Click Next.
The Vehicle Info screen displays something like this 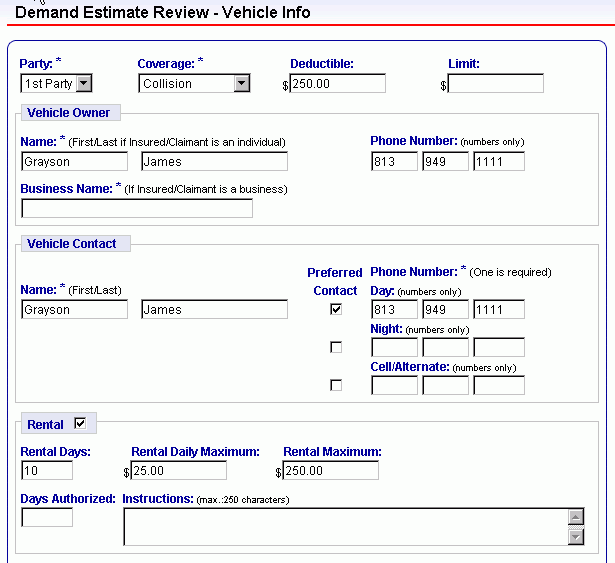 .
.
Select the Party. Choose from 1st Party or 3rd Party.
Select the Coverage:
For 1st Party - choose from Collision, Comprehensive, Underinsured and Uninsured.
For 3rd Party - choose Liability.
Enter the amount for the Deductible and Limit.
Enter the Vehicle
Owner information:
Any applicable claim information is defaulted into these fields and
can be edited.
If an individual, type the First name with any middle name or initial and then the Last.
If a business, type the Business Name.Type the owner's Phone Number including the area code, exchange and unit numbers.
Enter the Vehicle Contact information:
If an individual, type the First name with any middle name or initial and then the Last.
If a business, type the Business Name.Type the contact's Day, Night, and/or Cell/Alternate Phone Number including the area code, exchange and unit numbers.
Check the box for the Preferred Contact number.
If LYNX Services is to handle rental for this claim, check the Rental box.
For 1st Party claims, enter the number of Rental Days, the Rental Daily Maximum amount, and the Rental Maximum amount. If applicable, enter the Days Authorized and include any Instructions to LYNX Claim Representative specific to the handling of the rental for this claim. Instructions can be a maximum of 250 characters.
For 3rd Party claims, enter the Days Authorized and any Instructions to LYNX Claim Representative specific to the handling of the rental for this claim. Instructions can be a maximum of 250 characters.
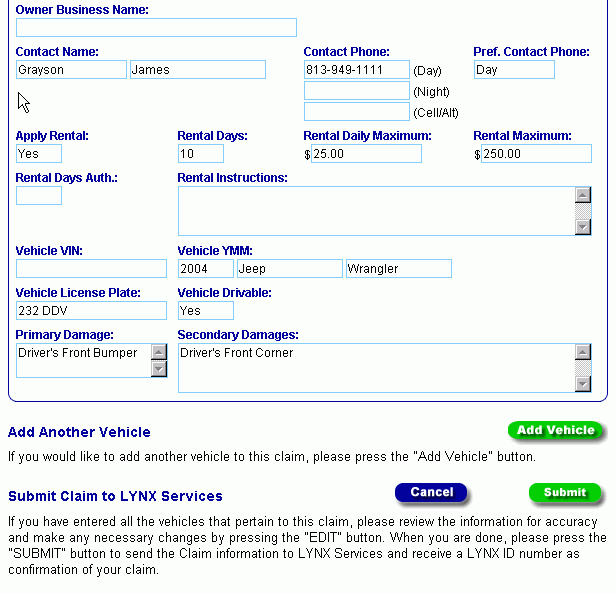
Complete the Vehicle Information screen by entering the following vehicle items:
Year
Make
Model
Drivable - select Yes or No
License Plate and VIN - either the License Plate number or the last six digits of the VIN is required.
Primary Damages - select the primary point of damage from the list.
Secondary Damages - you can select one or more points of secondary damage. To select multiple points of damage, hold down the CTRL key and click on the various points in the list.
Special Instructions/Additional Damage Info/Comments to Shop - .Enter any information necessary to the shop for handling repairs for the claim. You can type a maximum of 250 characters in this field.
Click Next.
The Summary screen displays something like this 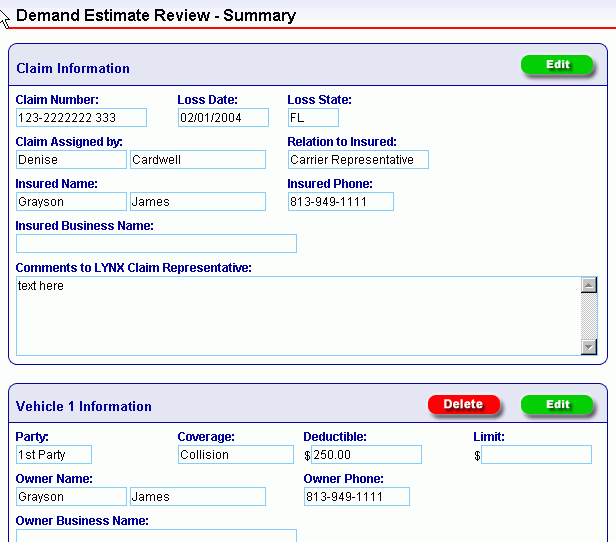
 .
.
Review the information for accuracy. If necessary, click edit to return
to the screen and edit the information.
From the Summary screen, you can Add a Vehicle.
Click Add Vehicle.
Enter the Vehicle Information as outlined in Steps 8 to 14.
Click Next.
Click Submit
to send the assignment to LYNX Services. The LYNX ID and Assignment Report
display something like this 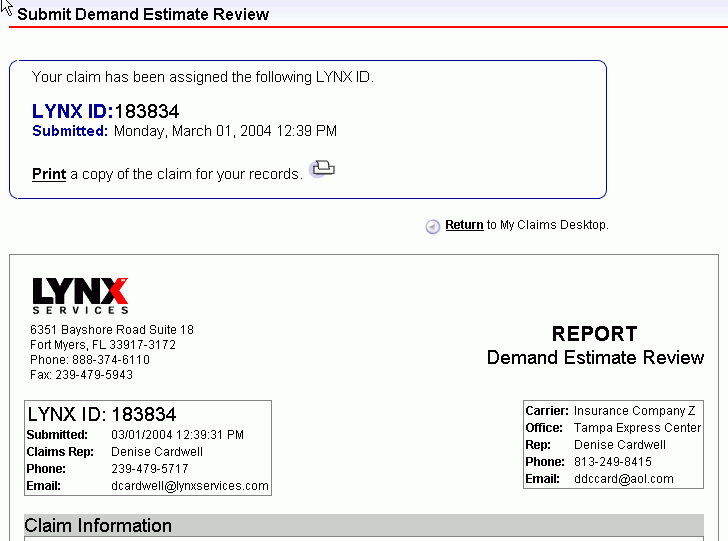
.
Click Print a copy of the claim for your records.